The Ultimate Guide to WordPress Custom Post Types
More than a decade ago, I made the life- and career-changing decision to focus solely on using WordPress as my publishing platform and the CMS for which I build plugins. The primary reasons were the excellent documentation, including countless posts with snippets and tutorials, and the ease of extending WordPress. For my use cases back then, the most prominent feature to extend WordPress was Custom Post Types.
Improved mainly with WordPress version 3 in 2010, Custom Post Types (CPTs) are used in many ways. I am sure you have met them without knowing. Let me give you an overview of CPTs, specific examples of how I used them over time, how to set them up yourself, and how to accomplish even more with related plugins.
What Are Custom Post Types?
WordPress core comes with various Post Types. The most obvious are Posts, Pages, and Attachments.
In WordPress 6.4, there are four more:
- Revisions
- Navigation menus
- Block templates
- Template parts
Fun fact: Comments are not a Post Type. I think if WordPress weren’t originally a blogging platform with comments as such a central part, one would nowadays handle them as a post type as well.
As these might suggest, Post Types are not always obvious and not necessarily something visible in the frontend that we would describe as “content”. They are more of a group of related items in the database.
You can add more of these “things,” which would then be called “Custom” Post Types.
It is not an official WordPress term, but I like the phrase Custom “Content” Types for any visible Custom Post Type. I will get into a few examples later.
Why Use a Custom Post Type?
WP Mayor has used multiple Custom Post Types over time, such as the Lifetime Deals one that you can see right now.
I have personally used Custom Post Types for many things.
The most common are separate content sections on websites. This makes the most sense when that content should show and behave differently than built-in posts and pages.
Let’s imagine that WP Mayor would also have a dedicated “News” post type. Just by registering this custom post type, one would have the following benefits:
- A distinct “News” item in the menu in WP Admin.
- The chance to grant users and user roles different capabilities to that type.
- Have different templates for showing single news items on the frontend.
- A separate archive and feed for news.
- Additional post metadata is stored only with and displayed for news.
I have also used Custom Post Types for content elements in various plugins. I once built a booking platform for vacation homes, where homes, reservations, and payments each were a distinct Custom Post Type with unique attributes. It’s something that most e-commerce plugins for WordPress are also doing.
In another case, I wanted to log the content of all outgoing emails. So, I built a “Log” post type with the email content and all attached metadata that was only visible with the appropriate capabilities in the WordPress backend.
Finally, the Advanced Ads plugin I originally developed used a CPT to store the ad content.
These are just a few examples of Custom Post Types. I know I must have forgotten to mention many other exciting use cases I met over the years.
The main advantage of CPTs in WordPress is that they only need a few lines of code or quick setup via a plugin, and WordPress takes care of a lot of the logic you need to manage and display them on your site. So, let’s get right into how to create WordPress Custom Post Types.
Creating a Custom Post Type
Custom Post Types can be created manually or through a plugin.
If you have no experience in coding, plugins make it much easier for you to create custom post types.
One disadvantage of using a plugin is that your Custom Post Type is gone as soon as you delete the plugin. While it probably still exists in the database, WordPress no longer knows about it in the frontend or backend.
As a developer who has done this dozens of times, I still prefer the manual method. However, I happily admit that I also use plugins with nice UIs if the WordPress Custom Post Type is used temporarily or to create a showcase for a client.
Decisions for Custom Post Types
Despite the method we are using to create our Custom Post Type, we need to make a few decisions first. While you could theoretically change any of them later, doing so might greatly impact your site and setup, so it’s best to think about them in advance.
Public or not?
The main decision about Custom Post Types is who should see and interact with them. With your custom code or within a plugin, you can choose whether the CPT is visible in the frontend, including archives and single pages accessible directly, and whether users find it via search. Should it appear on the backend of your WordPress site with its menu item?
While a “News” CPT is probably fully visible in the frontend, an internal log or something like payments might be restricted to users with a specific role in your WordPress backend.
Hierarchial
You may have noticed that WordPress Posts and Pages post types behave slightly differently. Pages don’t have an archive in the frontend, but you can have parent and child pages.
The latter is called a “hierarchy,” which is also defined when creating your own post type.
For hierarchical post types, the edit page offers the option to choose a parent page and an order.
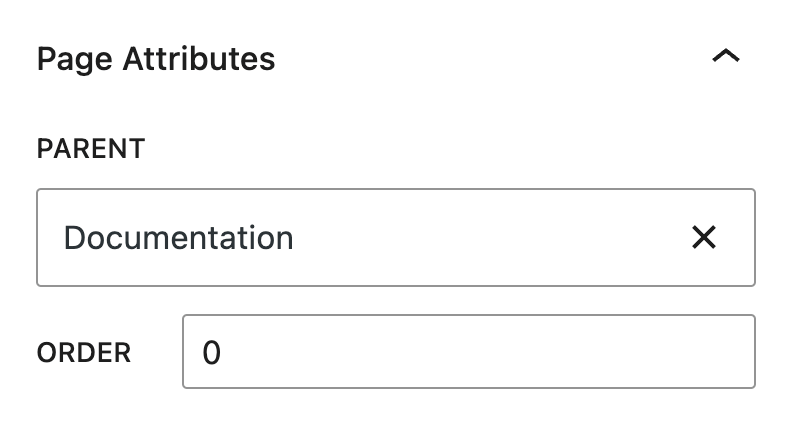
The order and parent page could matter when creating menus or lists from pages automatically. The hierarchy is also visible in the URL slug. If my page was “Troubleshooting” with “Documentation” as a parent page, the final URL might be documentation/troubleshooting.
Tip: If you have a CPT with a deeper hierarchy, I recommend using the Nested Pages plugin to quickly arrange posts in the correct order.
Block or classic editor
When creating a Custom Post Type, you are asked whether to show it in the “REST API” or not. That technical term does one crucial thing: it determines whether your CPT is using the block editor or the classic editor view.
As a rule of thumb, using the block editor makes sense if your post type is similar to regular content and you want to use WordPress blocks. Any Custom Post Type that does not need a large portion of the screen for content should choose the classic editor. Hence, it should not be delivered via the REST API.
URL slugs and structure
Another critical decision you need to make is naming the CPT slug. Our “News” post type might be referenced as news in the URL, but if you have more fancy internal names, you might want to choose a short form for the frontend URLs.
This might be an important decision for your SEO, so take a few minutes to think about this.
Supported elements
Depending on the post type you are building, you might also want to decide upfront whether to enable support for the following elements:
- Titles (enabled by default)
- The editor showing up (enabled by default)
- Comments
- Revisions
- Authors
- Excerpts
- Thumbnails
There are many more options to fine-tune. However, the above are the most important to consider before using our WordPress Custom Post Type.
Create a Custom Post Type with a plugin
With this in mind, let’s look at creating Custom Post Types using a plugin and then do the same manually.
I am going with one of the most popular free ones from wordpress.org: Custom Post Type UI (CPTUI) by WebDevStudios.
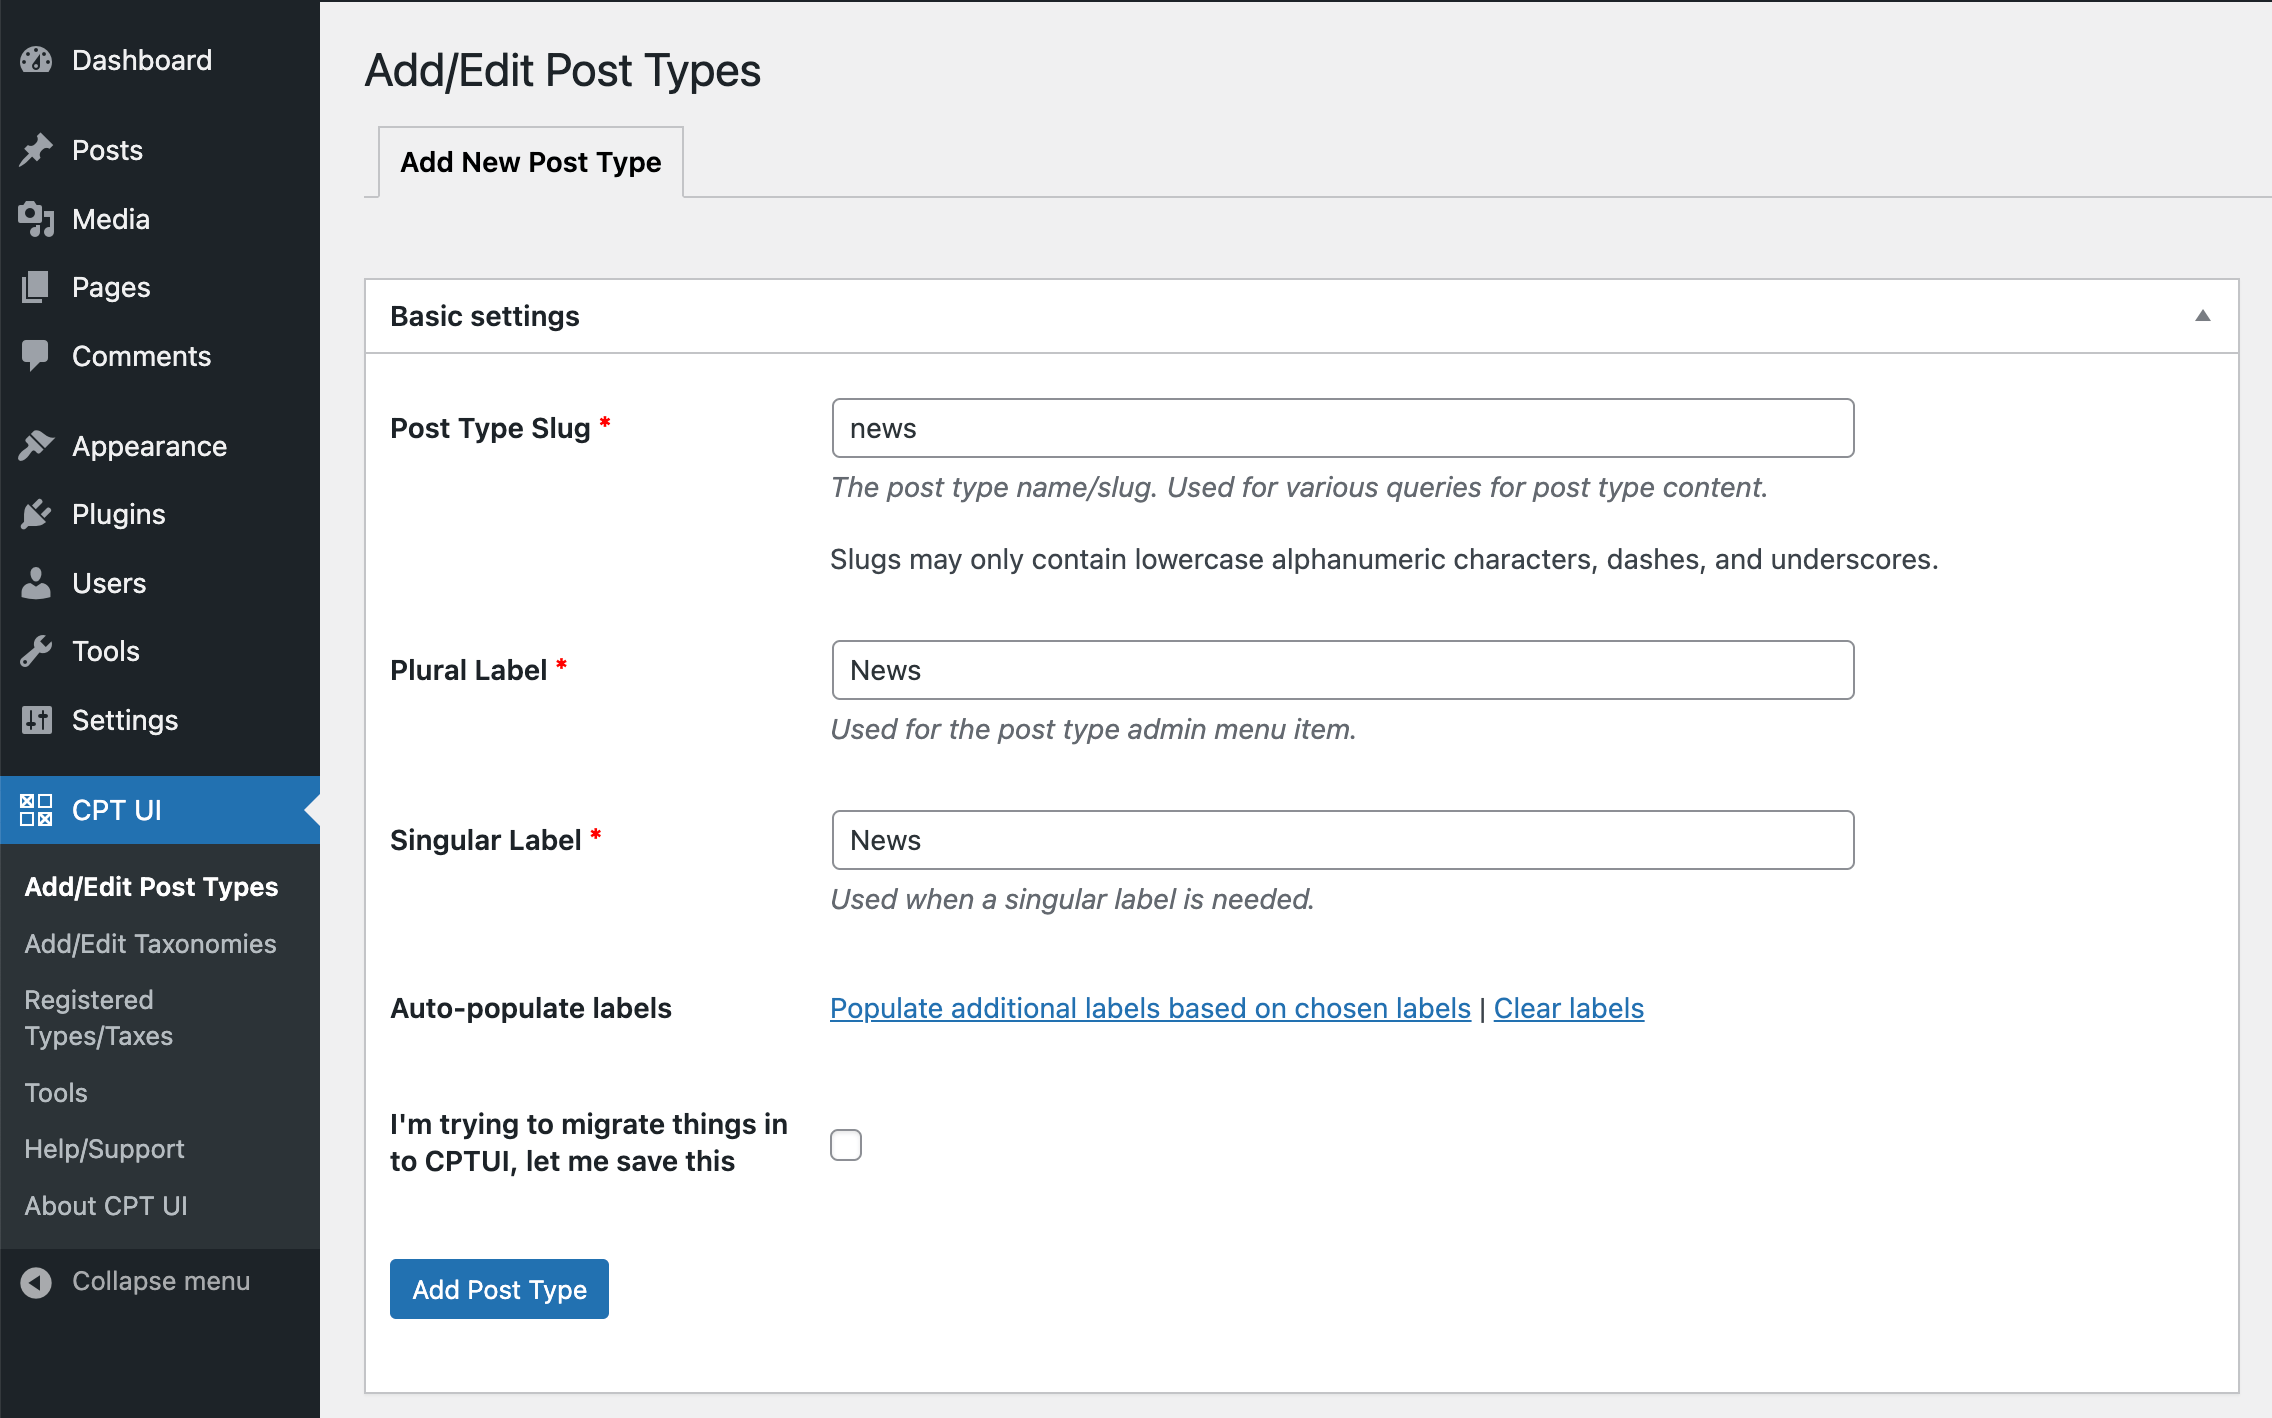
Their interface is pretty straightforward, with all the options one would expect from a Custom Post Types plugin. However, it also makes it clear that custom post types are still an abstract concept to grasp and not a feature a usual WordPress publisher should tinker with without deeper knowledge of the options.
Tip: I am personally conservative on the “public” options for my CPTs and limit them as much as possible regarding who should see them in the frontend and who should be able to change them in the backend. If needed, you can always grant more access later.
Advantages of Custom Post Type UI
There are a few things I like about this plugin that others might or might not have.
I usually create my CPTs manually, so I know that writing the labels takes a lot of time. There are around three dozen if you want to adjust all of them to mention your CPT’s name. As you can see in the screenshot above, the Custom Post Type UI plugin has an option to auto-populate these labels for you. You can still adjust them later in the interface.
Next, I can save my Custom Post Type and edit it later. I can even change the slug, and the plugin will then migrate all posts of that type. While I would try to prevent a situation in which I would need that, it is good to know that it is possible and handled by the plugin.
Custom Post Type UI keeps an overview of my post types. While it feels a bit overwhelming, it is much easier to review than custom code. I also like seeing the list of the templates in the last column.
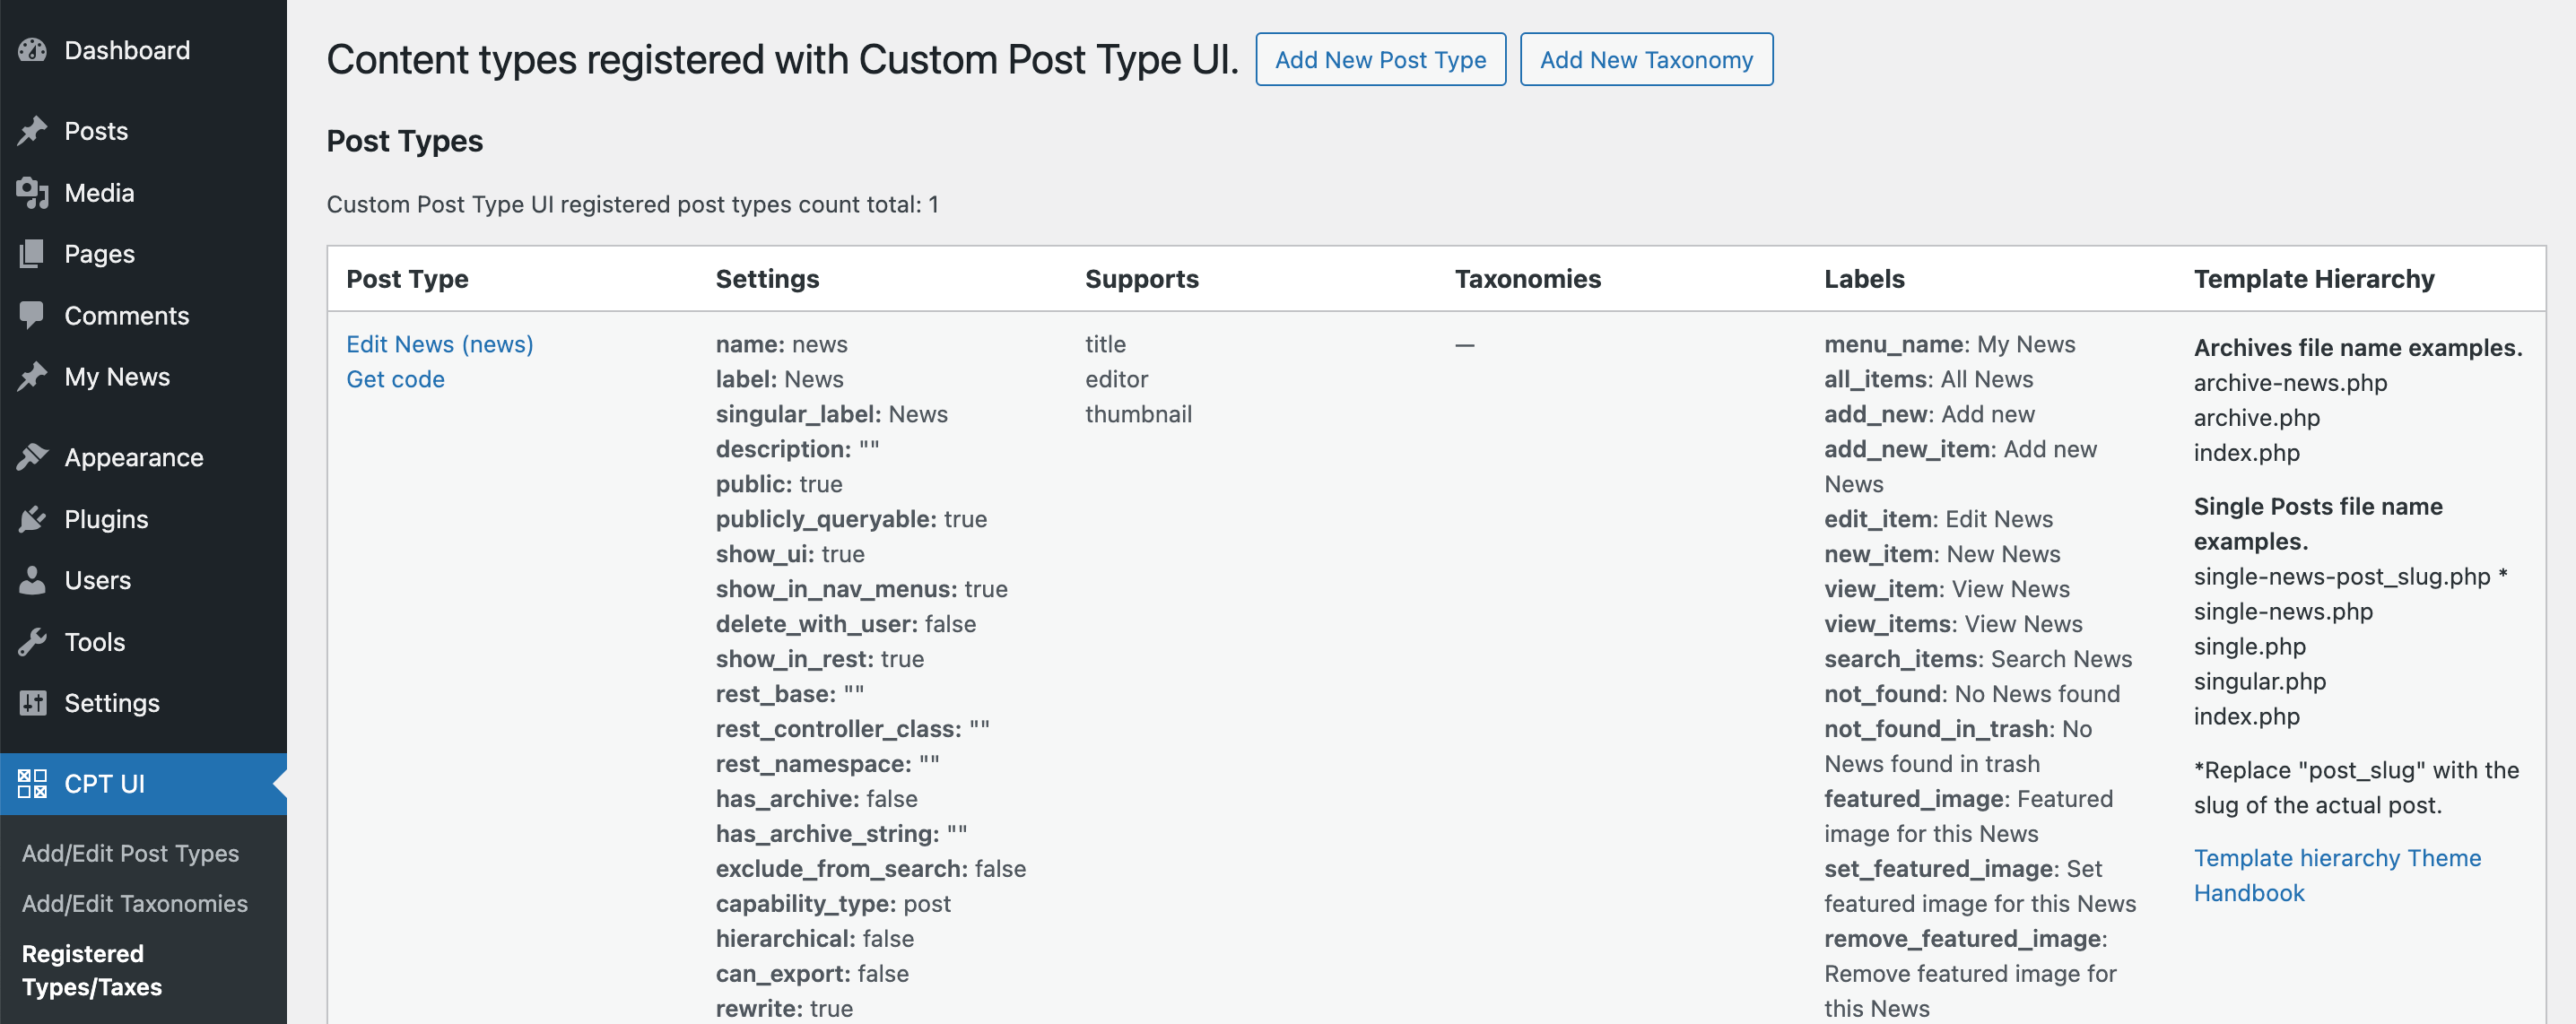
These templates are part of the magic of WordPress Custom Post Types. If our News CPT used the slug news then WordPress would automatically look for a file called archive-news.php in your theme to render the archive page of that post type or single-news.php for a single news page. See Template Hierarchy for more information.
Generating code with CPTUI
The feature that finally made me recommend Custom Post Type UI was the tool to export the CPT into PHP code. Under CPT UI > Tools > Get Code, you will find the PHP code to use in your plugin or functions.php. Kudos to the plugin developers for not locking people in.
This makes CPTUI an ideal tool for developers since we can quickly set up a Custom Post Type through the interface and then get the PHP code to use it. We can even let our customer set it up on a test site—with all the labels and so on—and then migrate it to where we need it.
The only option I couldn’t find in the plugin is to remove the custom post type with all its entities. In general, if you delete a plugin or code, the custom posts will remain in the database. However, there are dedicated plugins for cleaning that up.
Using code
If you are a developer and want to implement a Custom Post Type using code, then let me point you to the relevant sections in the WordPress documentation.
The core function to register a new Custom Post Type is the register_post_type function. Its parameters allow you to set all the options I mentioned above.
All Post Types are stored in the wp_posts table in your database. The field post_type determines which entry a post type belongs to.
You can use post metadata if your Custom Post Type is about more than just content. This data is stored in wp_postmeta.
By the way, some plugins use custom tables to manage content types. Don’t go that route unless you really have to since you wouldn’t be able to use all the built-in WordPress features and functions that come with the Custom Post Types API.
Extend Custom Post Types
If your Custom Post Type is public, you might want to customize it even more. Here are a few options.
Custom Fields and Meta Boxes
More advanced CPTs, like events or shop items, need more than content. This is where custom fields come into play. They offer input fields to structure your data in various ways. For example, an “Event” post type might need a beginning and end date or a venue so that events can be displayed and filtered.
While you can add custom fields and meta boxes with custom code, an excellent plugin for that is the very well-known Advanced Custom Fields. It has so many options and is so well maintained that even I, as a developer, wouldn’t code custom fields on my own sites.
Custom Taxonomies
As the default “Posts” post type can be ordered with “Categories” and “Tags”, you can register taxonomies for your Custom Post Type as well.
The Custom Post Type UI plugin I recommended above does help you create them as well.
Capability Management
You can use plugins like Members to create a new role for authors on your site who can only create and change your new Custom Post Type or adjust existing related user roles. This is recommended if your editorial workflow is different for each post type.
Switching Post Types
I am currently reorganizing content in an internal knowledge base built with WordPress. Posts and pages have very different goals here. Some of them changed goals, so I needed a solution to switch the post type.
While I wouldn’t recommend doing this lightly with a public post type, there is no issue doing that on a non-public site with similar post types. To accomplish this, I installed the Post Type Switcher, an excellent plugin that makes you do that with no fuss. After installing it, the plugin will add a “Post Type” section on the “Edit Post” screen. You can use this interface to change post types as needed.
Conclusion
I still consider Custom Post Types a critical feature that allowed WordPress to flourish in the last decade and beyond. It is the basis that turned our favorite CMS from a simple blogging platform into a versatile tool for managing events or online shopping.
When building plugins used on many websites, I still meet with code to create new post types. But when building sites for myself and customers, I am using plugins. They make creating and changing Custom Post Types much more straightforward and have a much better UI than I could ever build.


